The Ultimate Remington
by Bottom Dealin’ Mike
The night settled in with a bone-chilling cold that seeped all the way to your core. Heat from the campfire was just a teasing caress on the skin, but it couldn’t get inside a man far enough to make him feel really warm. All along the bivouac the condensed breath of troopers and horses hung like fog in the moonlit valley of the Washita. The reporter for the New York Tribune scribbled in his notebook with cold, cramped fingers. Every now and then he glanced at the coffeepot nestled in the glowing coals, waiting for the iron-tasting water to come to a rolling boil. When it did, he poured a cup full.
"Ain’t done yet," a trooper warned him.
"I know," the reporter answered.
He pulled his six-gun from its holster and deftly removed the cylinder. Earlier he’d put two rounds in the general direction of a Cheyenne brave who’d been showing more interest in him than in the 7th Cavalry troopers rampaging through the village. Now he had to clean the gun before black powder fouling turned it into a rusted mess. He dipped a muslin patch into the hot water and pushed it through the bore with a short rod. When the filthy patch fell to the ground, he looked down the bore. Firelight reflecting off his thumbnail illuminated the tube. He pushed another patch through to dry it before turning his attention to the cylinder. He pulled off the back-plate and dumped four cartridges into his palm. It took a tap with the cleaning rod to knock out the spent cases before he could wipe the cylinder clean and reload.
"Let me see that."
The reporter looked up at Tom Custer and shrugged. He replaced the cylinder before handing up the revolver. It was a .44 caliber, Remington New Model Army he’d picked up during the last months of the war. But, in place of the normal eight-inch barrel and heavily webbed loading lever, this revolver had a five and a half-inch tube. The loading lever had also been shortened and streamlined. Polished ivory grips reflected the ruddy glow of the campfire as the young officer turned it in his hands.
"Fires cartridges like a Spencer," Custer remarked. "What if you can’t find shells for it out here?"
"I’ve got another cylinder for loose ammunition," the Tribune reporter answered.
Custer grunted and handed it back. "How do you get one of those?" he asked.
"You build it."
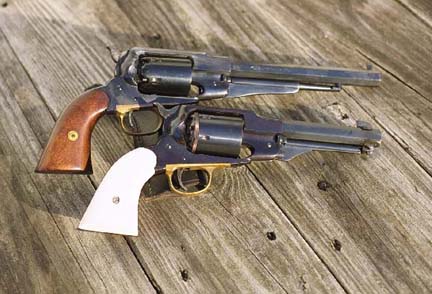
The Ultimate is a compact package compared to a full sized .44
That’s what Bottom Dealin’ Mike would have told Tom Custer in 1868, and that’s what I’m telling you today. If you want the ultimate Remington six-shooter, you’ll have to build it. It takes a little work and a little time, but the payback is worth the effort. I started building mine nearly ten years ago, and I kept tinkering with it over the years until I had just what I wanted. But it doesn’t have to take you a decade to build one of your own.
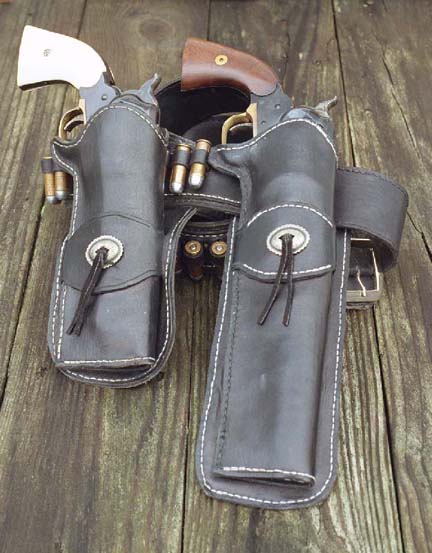
The ultimate means a lighter load for your gunbelt
It started for me when I got tired of pulling eight inches of barrel out of the holster every time I used my Remington replicas. When Colt introduced the Peacemaker in 1873 they offered it in three barrel lengths from day one. That was an unappreciated stroke of genius that Remington didn’t copy until 1890. Until then seven and a half and eight inch tubes were the norm on big bore Remingtons. If you wanted a different length, you bought yourself a hacksaw. Well, it just so happened that I already owned a hacksaw. And, I wasn’t afraid to use it. Since I had a hankering to see how a short barreled Remington would handle, I put that saw to the metal. The rest is history. I probably ought to tell you right up front that I’m not a professional gunsmith. Of course, I’m not a professional biologist either, but that didn’t stop me from making two fine sons. So, don’t let a lack of professional credentials hold you back. If you have enough coordination to hit the floor with your feet in the morning, you can tackle this project. The toolkit for this job is very basic. You’ll need a hacksaw, a few files and a drill. A propane torch is handy, but not essential. Pick up some sandpaper in a variety of grits and a bottle of .44-40 Cold Blue and you’ll be good to go. If you stick to just the cap and ball format, the job will cost you about $30. Throw in a .45 Colt cartridge cylinder from Kenny Howell, and the ultimate Remington will take a bit over $250 from the piggy bank.
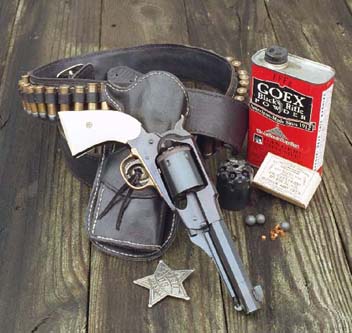
The Ultimate Remington is equally at home with loose ammunition or cartridges.
The job breaks down into four stages. First we’ll cut the barrel down. After that we’ll make a new sight and loading lever catch and install them. The third step is shortening and re-configuring the loading lever. Then we’ll make a set of poly-ivory grips. Let’s start with the barrel. Take a hacksaw and cut off the last two and a half inches. The hardest part of this job is taking that first stroke on your perfectly good six-gun. If you can get over that mental hurdle you’re home free. You’ll want to keep the muzzle true. That’s easy to do with a lathe, but there’s a trick I’ve used dozens of times that will let you do it by hand with a handsaw. Take a piece of masking tape and wrap it around the barrel so the forward edge of the tape defines your cut. If the tape is applied straight and true its end will perfectly overlap its beginning. Saw nice and slow along the edge of that tape and everything will come out fine. After sawing, use a wide file to smooth up the muzzle. Hold it as flat to the muzzle as possible and file out the saw marks. Keep the tape on the barrel and use it as a guide. It’s also a good idea to check the muzzle with a steel square as you do this. It takes a while, but it isn’t rocket science. When the muzzle is filed clean, I chamfer the end to de-burr it. All you need to do this is a one-inch grinding ball. Press it to the muzzle and hand-turn it a few rotations to clean up the muzzle. Don’t chuck it in a drill or a Moto-tool. You don’t need that much cutting power and you are very likely to grind the muzzle oval instead of round. After the muzzle is squared away, you’ll remember that the original front sight and loading lever catch are attached to that stubby barrel-end on your shop floor. We’d better give a thought to how we’ll replace them. My solution is to make new pieces out of steel bar stock and dovetail them to the barrel. A couple of inches of half-inch square bar stock are all you need. Cut off a half-inch cube and then cut it into a "T" configuration. Turned upside down, the leg of the "T" will be your sight blade. Make it an eighth of an inch thick. The cross bar of the "T" will become the male dovetail base for attaching to the barrel. To make the dovetail, put the sight blade in a vice and scribe two lines, three eighths of an inch apart, across the base. Saw on these lines to a depth of an eighth of an inch. Then turn the sight blank sideways and undercut the blade on each end until you reach those lines. Then cut the dovetail angle with a triangular file. It isn’t hard, but you’ll get your best results if you grind the teeth off of one face of the triangular file. Keep that "safe" side against the underside of the sight blade as you file. Making a new catch for the loading lever is pretty much the same as making sights. First, cut a dovetail slot into the bottom barrel flat, then cut the bottom of a half-inch cube of bar stock into a male dovetail. You can install it on the barrel and then file a groove into the back face for the loading lever catch. After that, it’s just a matter of filing it into a pleasing shape. I blued both the sight and the new catch by heating them with a torch enough to draw some carbon to the surface, and then polishing them. With that out of the way, we can move on to the loading lever. We’ll have to disassemble it by driving out the small pin that keeps the latch in place. Then put a drill bit that’s a good fit into the lever and mark the depth of the latch-hole on the bit with a piece of tape. That will help you drill the new hole to the right depth later. On my Armi San Marcos replica the diameter of that hole was 5/32 inches, but yours may be different, so be sure to check it. After that, you can remove the latch and spring and cut the lever short enough to just clear the new catch on the barrel.
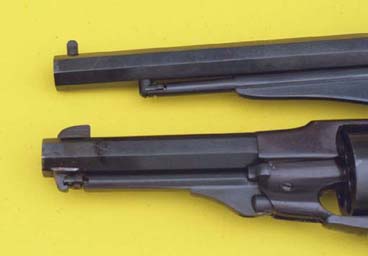
Bottom Dealin' Mike made a new loading lever catch and a front
sight out of bar stock and dovetailed them to the barrel
Now we’ll drill 3/32-inch hole an eighth of an inch from the new end of the lever. We’ll make a pin out of a six-penny finishing nail to eventually keep the latch in place, but first we’ll need to drill that 5/32-inch diameter hole into the length of the lever to accommodate the latch. Then with a hacksaw and files, we’ll cut the slot in the end of the lever and put it all together. In the interest of total honesty, I’ll tell you that this slot is a weak spot. I eventually cracked the small tab of steel under the latch on my loading lever. I fixed it with a small bolt and nut, and it has been going strong for years. But try to be careful here. After shortening the loading =lever, I thought the web looked awkward, so I cut it off, leaving just a small area near the plunger. This gave the Remington back it’s streamlined look. In some ways it now resembles an 1890 Remington. It’s a look I like, but it may not please you, so shoot it for awhile with the web on to see how you like it before you do any cutting.
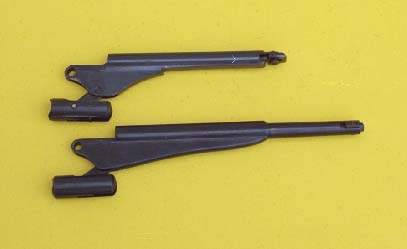
The loading lever on the Ultimate Remington is shorter than a
standard rammer and the web is removed.
At that point I could have been done, but to my eyes, six-guns look undressed without a set of ivory grips. Of course, real ivory is out of the question on my budget unless I should happen to shoot an elephant out on the garden some morning. Luckily, Dixie Gunworks (Box 130, Gunpowder Lane, Union City, TN 38281) came to the rescue. They sell blocks of poly-ivory for scrimshaw. The rectangular block is half an inch thick and measures four and five eighths inches by five and five eighths inches. It’s perfect for making a set of grips, and at $20, you can’t beat the price. These blocks cut easily with coping saws and rasps. You can work them like wood, but they are harder, and will polish up better. I start by tracing a grip panel onto a piece of light cardboard like an office file folder. After cutting out the tracing, I put it back on the original grip panel and poke out the hole for the retaining stud. Then I try the cardboard template on the gun. If everything fits fine, I’ll trace the pattern onto the poly-ivory and saw out a grip blank. I use a pair of "C" clamps to hold the cardboard template to the poly-ivory blank so I can use files to bring the shape of the blank right down to the template. Then I drill the stud hole into the blank. At this point, the grip blank should fit perfectly onto the revolver. When both panels are fitted, you can start rasping them down to their final contours. I like my grips a little thinner than the factory grips; making my own lets me get them just the way I want them. After rasping the grips to rough shape, I file out the rasp marks and start sanding. This is the longest part of the whole job, but it’s very important that you don’t skimp here. I start with coarse, 60-grit sandpaper and work my way down to 400-grit. After that, I move to 0000 steel wool. For the final polish, I unravel about six inches of sisal rope and buff the grips with the fibers.
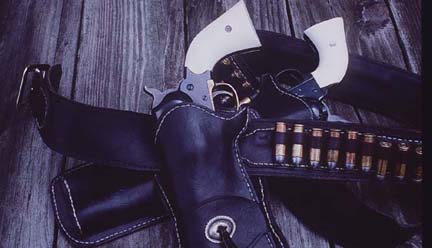
Bottom Dealin' Mike made these grips from poly-ivory block sold for scrimshanding. Dixie Gun Works was his source
After making the grips, my Remington remained unchanged for quite a few years. It was a slick, fast handling cap and ball six-shooter, and I was very pleased with it. But, in the last couple of years, I’d found myself putting the Remington of the shelf in favor of cartridge single-actions. Thanks to Kenny Howell that’s not the case any longer. Kenny runs the R&D Gun Shop (5728 E. County Rd X, Beloit, WI 53511) and he’s re-created the two-piece cartridge conversion cylinder that Remington originally sold in 1868. Putting one of these cylinders in .45 Colt chambering onto my Remington has breathed new life into an old friend. Now it has become one of my favorite guns for Cowboy Action matches. So, whether it’s 1868 or the present, the ultimate Remington can earn its keep.


